Featured Post

'Jambons'

I don't know if 'Jambons' are only available in Ireland, but they are a very popular hot snack here. Puff/flakey pastry squares ...

29.12.21

'Jambons'


I don't know if 'Jambons' are only available in Ireland, but they are a very popular hot snack here. Puff/flakey pastry squares with a ham and cheese sauce filling, the corners folded in. Straight out of the oven the filling is like molten larva! 

They remind me of the Vol-au-vents my Mother made  in the 1970s and 1980s. Here is my version. Don't feel you have to make pastry, I like making pastry and find it easy, ready made puff pastry is fine.


Cheese Sauce

1oz butter

1oz flour

9floz milk

3oz grated cheese

1teaspoon smooth mustard

Jambons

Makes 8

Flakey pastry made with 12oz flour and 8oz butter or bought puff pastry

chopped ham

grated cheese

egg wash 


Make the cheese sauce first as it has too cool before you put it on the pastry.

Melt the butter in a saucepan and add the flour, cook over a low heat until the flour has absorbed the butter and started to go sandy. Remove the pan from the heat and add the milk an ounce at a time stirring well so there are no lumps. When all the milk is added return the pan to the heat and bring to the boil for a moment. Take the pan back off the heat and stir in the grated cheese, let cool for 5 minutes and add the mustard, taste and add more if you feel it is needed and leave to cool.


Preheat the oven to GM6, 200˚C.

Roll out the pastry and cut into 6 inch squares. Place the squares of pastry on baking trays and add the a tablespoonful of cool cheese sauce and some chopped ham, then add a little more sauce to each and a couple of extra bits of ham. Sprinkle with grated cheese and fold in the corners of the squares and squeeze together the new corners. Brush with egg wash and bake for about 15 minutes.


Leave too cool for 5 minutes before eating, we like them with salad. 

You can also see a mushroom version in the photos.

I cooked a small punnet of mushrooms and some garlic in butter added them to some parsley sauce and sprinkled some cheese on top like the ham ones.


10.12.17

Gingerbread House


It is a miserable day here, wet and windy, with not a hope of venturing out. I gather there is snow in other parts of the country. A day to stay in and keep warm and do a bit of baking maybe? 
This is a recipe for gingerbread given to me by another cookery teacher I worked with, thank you Aoife, it is a great basic recipe.

The template I used is Marry Berry Gingerbread House template and printed it out 2 pages to a sheet, ie half size.

I just used instant royal icing as glue and for decorating, but you could use melted chocolate, it sets faster than the icing and add sweets for decoration.


The important thing is to have fun and enjoy the process, as you can see from the photos mine isn't perfect, but it was tasty!


100g butter
300g plain flour
1 tsp bread soda
2 tsp ground ginger 

150g brown sugar
3 level dsp golden syrup 

1 egg
1 bag instant royal icing  or lots of white chocolate

1 X 9 inch straw board

Set the oven to 180 ̊C / GM 4
Grease 2 large baking trays with butter.
Cut the butter into small cubes and place in a bowl.
Sift the flour, bread soda and ginger into the bowl.
Rub in the butter until the mixture resembles breadcrumbs.
Stir in the sugar and add the syrup and the egg to the mixture.
Mix to form a smooth dough.
Divide the dough in half and roll out one half on a lightly floured surface to 7mm thick.
Cut out half the gingerbread house shapes and transfer them to the baking trays leaving lots of space between the pieces. Try not to distort them. Repeat with the remaining dough.
Bake for about 12 minutes until a shade darker. Let them cool for 3-4 minutes and then lift them onto a cooling rack.
Any extra dough can be used to make extra stars and biscuits.


When cold assemble on the straw board using the icing or melted white chocolate as glue. Decorate when firm. 

Love this from Waitrose, turn your gingerbread men upside down to make reindeer!

12.7.17

Annual Cleanse Revisited!


I've been lucky enough to have been given a Magimix to replace my old mixer and I've been thinking of ways to use it more when I was scrabbling around in the freezer and found a bag of marmalade oranges. Could I? I wondered, use the Magimix to chop them up to make a batch of marmalade?


I halved the oranges and squeezed them as usual collecting the seeds and membranes, then I quartered the skins and then used the 2mm slicing disk to slice them into the bowl.


I then replaced the slicing disk with the blade and pulsed the blade until the peels had the consistency I was looking for. As I transferred them to the preserving pan I ran the pieces through my fingers to find any large pieces, which I chopped by hand, there were remarkably few of these. I soaked the peels and pips overnight and made the marmalade the next day.


Not only have retired my mixer I can now retire my hand cranked mincer


By using frozen oranges I find I don't need to boil the peel as long to soften it, consequently the amount of water needed is less.


15.2.17

The 2017 Salad Crisis and Burgers


There has been a shortage of courgettes and salads due to bad weather in Spain. I hadn’t really noticed as we don't buy courgettes in winter, because we grow them in summer and anyone who has ever grown their own courgettes knows, by the end of the season you don’t want to see another courgette until next May at the very earliest!

Salad leaves are different we do buy some during the winter to supplement the leaves we grow in the poly tunnel. Little gems are our favourites and we’re quite bad about composting the outer dark leaves preferring the inner pale leaves. This is a waste of the outer leaves, so what to do?

Well, for a start I gave the slightly floppy outer leaves a good soak in some cold water with a spoonful of salt in it for about 45 minutes, then I drained the leaves and dried them in a salad spinner. After that they went into a container covered in damp kitchen paper in the fridge over night.

They were crisp the next day and perfect for a salad. I used them in a classic Caesar salad and got to thinking about all the Caesar variations there are out there, with bacon or chicken, blue cheese or avocado or sometimes all of the above!

Blue cheese……….. there was some blue cheese butter in the fridge, some cream and I was making burgers from some minced beef……… how would burgers with blue cheese and lettuce sauce go down?

Very nicely as it turns out.


Burgers with Blue Cheese and Lettuce Sauce

The finished burger

250g beef mince
salt and pepper

1tbs butter
1tbs blue cheese
100mls cream 
10 lettuce leaves

2-4 slices of onion
4 slices of aubergine or 2 flat cap mushrooms 

2 slices of Parma ham or 4 slices of pancetta

Season the mince with salt and pepper and shape into two burgers and leave to rest in the fridge.

Mash together the blue cheese and butter with a fork and put into a small saucepan with the cream.
Slice the lettuce leaves longways removing the centre rib if you like.

Brush the onion and aubergine slices with oil and fry in a pan until nicely browned and keep warm.
Bake or grill the mushrooms with a knob of butter, salt and pepper until just done and keep warm.  

Grill the Parma ham or pancetta till crisp.

Heat a pan or grill to cook the burgers and put the blue cheese butter and cream on to a low heat to melt.

When the blue cheese is liquid add the lettuce leaves and bring to a simmer until the lettuce is wilted and the sauce thick.

Lettuce sauce!

Cook the burgers as you like them and place on the aubergine slices or flat cap mushrooms and top with the onions and the sauce and then the Parma ham or pancetta.  

Building the burger

12.1.17

Sausage supper and some thoughts on photographing food

       There are some days when food just needs to be easy and quick and grilled sausages with fried onions and a salad are the perfect.
       The sausages are from a deli called Iago on Princes street, they use to have a stall in the English market, but the new shop is bigger and brighter. The sausages are specially made for them and the thick meaty, fennel and garlic ones are our favourites.

       We are still eating onions we grew in the garden last year, sliced thickly and cooked slowly in some olive oil with a seasoning of salt and pepper, they make a soft bed to put the sausages on. 
The salad of fennel and orange is one of our regular winter salads I blogged about last February, its sweetness complements the onions and to stop it being over sweet we add a good squeeze of lemon juice. It is particularly nice when made with blood oranges. The fennel gives a crunch amongst all the softness.

       I tweeted about this supper the night we ate it, but I didn’t post a photograph. Someone questioned if it had happened, in a joking way, and I said I’d been too hungry to take a photo and that I thought people would be sick of food photos after Christmas. Anyway I like to take a good photo of the food, to do it justice. I did take the photo below the next day of the leftovers.

Leftover sausage supper.


       So is it important to take a photo or just enjoy the moment of sharing the food?
For me cooking and sharing the food is more important. Sharing food is what makes us friends and friendship keeps us connected to other people. In reality very few dishes are photographed and posted on social media considering the number of meals consumed around the world each day.
We are lucky to have food and more than enough.

       When I do photograph my food it is usually for a blog post here or as an aide-mémoire when eating out. I do my best to make the images interesting, informative and in focus for here, but when we are eating out they tend to be a quick snap so I can recall each of the elements on the plate and quite often they are not perfectly in focus or they will have a shadow of the camera/phone in them. As in the one below.

Octopus and black chickpea stew.


       The eating out photos are useful to help me create new dishes at home by maybe bringing in an element that was particularly tasty or for seeing whether a flavour or texture go well together or not, all these add to our everyday meals. Very few of which are ever photographed.

       Do I need to share more of these, I don’t think so. I write this blog to keep my hand in at writing and as a way of recording what’s around me here. 

Thank you for reading this.

8.11.16

Pisces or "Two Fish Dishes"

       My zodiac sign is Pisces, two fish swimming against each other, and I am very indecisive. I've started teaching an evening cookery class for adults, very different to taking children's classes. I'm being pulled by these two different classes, but I am getting there. This week the adults are making these fish dishes, they are quick and do not need much added to them, perhaps a salad or more vegetables cooked quickly while they bake.


Gremolata Crumbed Hake

Gremolata Crumbed Fish With Roast Tomatoes

      I freeze the heels of the bread and they make great breadcrumbs whizzed up in the Magimix, you can even add the garlic and parsley while making the breadcrumbs to save time.

Per person

handful of breadcrumbs
1tsp of grated lemon zest
½ a clove of garlic very finely chopped
2tbs of chopped parsley
squeeze of lemon juice
salt and pepper
1tsp olive oil
1 portion of white fish, hake, whiting, cod or haddock 
6-8 cherry tomatoes

Heat the oven to GM7, 220 ̊C and line a baking dish or tin with baking parchment.  
      Mix together the breadcrumbs, lemon zest, garlic, parsley, lemon juice, salt and pepper.  

      Place the fish on the parchment skin side down and cover the top of each fillet with a layer of the breadcrumb mix. 
      Dribble the olive oil over each one and add the tomatoes around them. 
      Bake in the hot oven for about 20-25 minutes, more if the fillets are very thick. Serve with a wedge of lemon. 


Soy Ginger Salmon


Soy Ginger Salmon 

      This is a cheats version of "teriyaki" dish without the sugar, soy sauce, ginger and scallions are staples in my larder. By the time the oven has heated up the topping is mixed and while it is in the oven I steam some asparagus or sauté some spinach with more ginger and some garlic. All done in under half an hour.

Per person

1 portion of salmon
2tsp soy sauce
thin slice of ginger chopped
chilli, a few slices or a some dried chilli flakes optional
1 scallion sliced
a squeeze of lime juice
pepper and salt

Heat the oven to GM7, 220 ̊C and line a baking dish or tin with baking parchment.
      
      Place the salmon onto the baking parchment, skin side down.
      Mix together the soy sauce, ginger, chilli, scallion, lime juice, a pinch of salt and some pepper, spoon this mix over the salmon on the parchment. 
       Bake in the hot oven for 15-20 minutes. Serve with a wedge of lime. Steamed asparagus or some wilted spinach is perfect with this.


6.9.16

Ballymaloe Gardenfest 2016

Binning the bagged Salad & growing your own in a “fish crate” 
sized space


Ballymaloe Gardenfest 2016 Talk by Johann & Tom Doorley


Tom’s/Rowley's Dressing


Mustardy!

We like to use a mixture of oils, extra virgin olive oil for salads, light olive oil and sunflower oil for cooking and mayonnaise and toasted sesame oil for added flavour. These are our favourites, but feel free to experiment with the recipe.

smashed clove garlic
100ml olive oil 
3tsp* Dijon mustard (*2 heaped & 1 not so heaped)
3tbsp red wine vinegar

Put the garlic into a jar and add the rest if the ingredients, cover with a tight fitting lid and give it a really good shake until it forms a thick sauce. Pour over salad leaves and toss & serve.

My sister Madeline and her daughter Holly are "Brown Envelope Seeds" in west Cork, they do 4 salad mixes for the 4 seasons. 


Charlotte’s Dip
Our daughter au paired in France and this was a family favourite with her host family, even with the three little boys she looked after.

In a bowl whisk together 1dsp soy sauce
and 3dsp of made mustard, while whisking trickle in 
100ml light olive oil mixed with 50ml sesame oil until thick.

Toast 3tbsp sesame seeds in a dry pan and serve with the dip and crudities, Charlotte liked to include blanched calabrese in the vegetables, but carrots, radishes & cucumber are the main ones we use.
“Fly Away” is the carrot of choice for us.


Mayonnaise


All you need for Mayonnaise 

The quality of the egg makes a huge difference to the mayonnaise, proper free range with thick, dark orangey yolks are best.

1 egg yolk
¼ tsp dry mustard
pinch of salt
lemon juice/vinegar
150-170ml oil (about 100ml sunflower & 50ml EVOO)
pepper

Put the egg yolk, mustard and salt into the bowl of a food processor and add a squeeze of lemon juice to dissolve the salt. Run the processor and start adding the oil a little at a time and then in a thin stream. 
If the mayonnaise becomes very thick add more lemon juice or if it is too runny don’t add all the oil. Taste and pepper and add more salt and lemon juice as you see fit.
We sometimes flavour our mayonnaise with crushed garlic or chopped herbs or a spoonful of harissa or chopped preserved lemon skins.


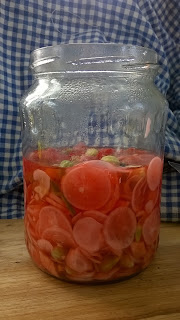
Pickled Radishes


Ready to slice.

Mix together
12-16 radishes very thinly sliced
a peeled slice of ginger cut into matchsticks 
a small chilli very thinly sliced
4 peppercorns
1tsp salt
And leave for 5-10 minutes stirring once or twice. 

Pack the radishes into a sterilised jar* and pour over the liquid and add 50ml of cooled boiled water and 50ml of vinegar, mix gently and leave. We sometimes add a few nasturtium seeds or buds too.
These are pretty much ready to eat after an hour or two and will keep in the fridge for a week at least.  

*Nutella jars are good as they have plastic lids.


Pickle jar